DIY Washi Tape Frames:


As a cheap, easy and surprisingly chic alternative, consider framing magazine clippings, photographs and postcards with different colored tapes. The supplies travel lightly, can be changed frequently and can be purchased for very little. For more tips and directions on achieving this look, continue after the jump!


To make these fun and stylish tape picture frames, all you’ll need are a few images to frame, one or more kinds of decorative tape, scissors and an X-Acto knife or similar blade. For tape, we used Japanese washi tape (available at many craft stores or online here), black masking tape and copper foil tape. Tape comes in all shapes, sizes, colors and textures, so do some browsing and find what you like best!

When you have your materials assembled, begin by taping up a single image. It’s important to tape up and frame your images one at a time so you can be sure of how much surrounding wall space you’ll have left. Once your image is up, take a roll of tape and make a frame around your image, adjusting the size and amount of interior space to your liking. As illustrated in the first image, you can go far beyond a simple rectangular frame. Mix it up! If there are bits of tape that are longer than others or overlapping in awkward ways, use your X-Acto blade to carefully trim off the excess. Move the blade lightly over the tape to avoid putting marks on the actual wall. This technique is especially useful when making non-rectangular frames.

Ta-da! That’s it! Easy peasy. Now gather some tape and some pictures, and make yourself some snazzy frames. I guarantee you’ll feel instantly fancier.


Image result for washi tape framed pictures tumblr


Hand Painted Pillows:


Etsy.com handmade and vintage goods


This project shows you how to put beginner level sewing skills to use to create your own envelope pillow covers donning two simple fabric-painting techniques: quick freehand painting and super easy custom stamping.

The freehand painted pillow can be completed in less than an hour, while the stamping technique may set you back about two-and-a-half hours of primarily easy repetition. This project will create two 18” x 18” pillows. Adjust the measurements accordingly for other sized pillows.

etsy-how-tuesday-handpainted-pillows-materials


You will need:
Two 22” x 54” strips of white cotton canvas fabric
Multi-surface or fabric craft paints in black, teal, bright pink, yellow, and dusty pink
Paint brushes
Adhesive-backed craft foam
Blank wooden circles
Scissors
Iron
White thread
Sewing Machine
Ruler or Measuring Tape
Pins


Step 1: Use wide, flat brushes to create a brushstroke pattern. I painted quick, imperfect Vs around a center point to create bursts. Begin with quite a bit of paint on the brush, painting until the brush is nearly dry. Don’t overthink it – messy can be good for this technique.

For a little contrast to the messiness of the bursts, I added in circles of black dots by creating a ring of dots with a pointed-tip paintbrush and then filling more dots in.


etsy-how-tuesday-handpainted-pillows-2


Step 2: Make custom stamps by cutting out shapes of your choosing from the adhesive-backed foam. I made five different irregular circle shapes – one for each of my paint colors. Remove the paper backing and stick to a blank wooden circle.


etsy-how-tuesday-handpainted-pillows-3


Step 3: Apply paint to a stamp using a paintbrush and stamp onto the fabric. I created a grid pattern with my irregular circles, using the edge of the wooden circles as a guide to evenly space my stamps. Put on your favorite TV series because, while this may be super easy, it can be a little time consuming.


etsy-how-tuesday-handpainted-pillows-4


Step 4: Once the paint has dried, trim each fabric strip down to 19” x 46.”


etsy-how-tuesday-handpainted-pillows-5


Step 5: Fold ½” of fabric over twice on each of the 19” edges, then press into place with a hot iron.


etsy-how-tuesday-handpainted-pillows-6


Step 6: Sew each of the folded ends about ¼” from the edge.


etsy-how-tuesday-handpainted-pillows-7br


Step 7: Fold each of the sewn ends towards the center with painted side of the fabric facing inward so that each end is overlapping by 8” and the total pillow cover is just less than 18” wide. Press and pin into place.


etsy-how-tuesday-handpainted-pillows-8


Step 8: Sew the top and bottom edges into place about ½” from the edge. Finish the seams with a zig-zag stitch, serger, or pinking sheers (optional).


etsy-how-tuesday-handpainted-pillows-9


Step 9: Turn right side out, press, and finish with an 18” x 18” pillow insert.


etsy-how-tuesday-handpainted-pillows-vert


And this is your finished product! A beautiful, colourful pillow to add to your room for a pop of colour.

DIY Amethyst Mirror:


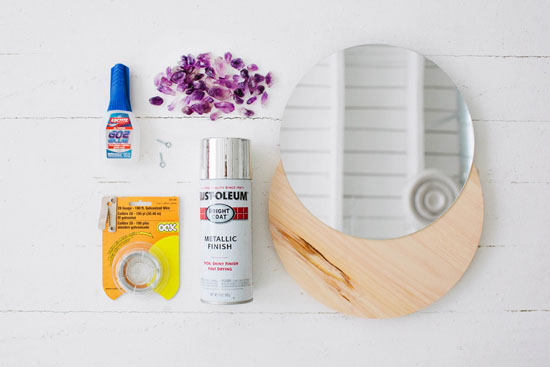
DIYMirror001

what you’ ll need:

• 11 inch round wood clock face
• 10 inch round mirror
• amethyst crystals (we purchased 200 amethyst pieces from BlissCrystals on etsy)
• Loctite Go2 Glue
• Silver spray paint
• 2 small eye hooks
• wire


• Spray paint both sides of clock face. The back of the clock face will be the front of the mirror.

• Glue mirror to clock face and press surfaces together. Allow to set for 30 minutes


• Using a generous amount of glue, attach crystal pieces around the border of the mirror, with some overlapping the mirror edge to conceal it. Let the glue cure overnight.


• Attach eye hooks to back edge of wood (pre-drilling holes makes it easier.)

• Thread wire through eye hooks and twist to tighten so that the wire is taut and not visible from the front.


And there you have it, simple and so pretty! I think this mirror would make the best gift for those hard to buy for friends. I know I sure wouldn’t mind receiving one! What do you think?